Audience: new sales/office staff. Time: ~10–15 min per quote. You must be logged in. Have the customer's name, address, phone/email and the window list ready.
The big picture: The form flows top to bottom — you can't add windows until you Confirm Defaults, and you can't generate paperwork until required customer fields + at least one line item exist.
Start a new quote
From the dashboard click the red "New Quote" (top right). Opens the Quote Calculator (/calculator).
Customer & Region
Enter name, email, phone, address; pick Province. The section collapses to a one-line summary when done.
Project Defaults (REQUIRED)
Set Install Code, Ext/Int Color, default glass & packages, then click "✓ Confirm Defaults".
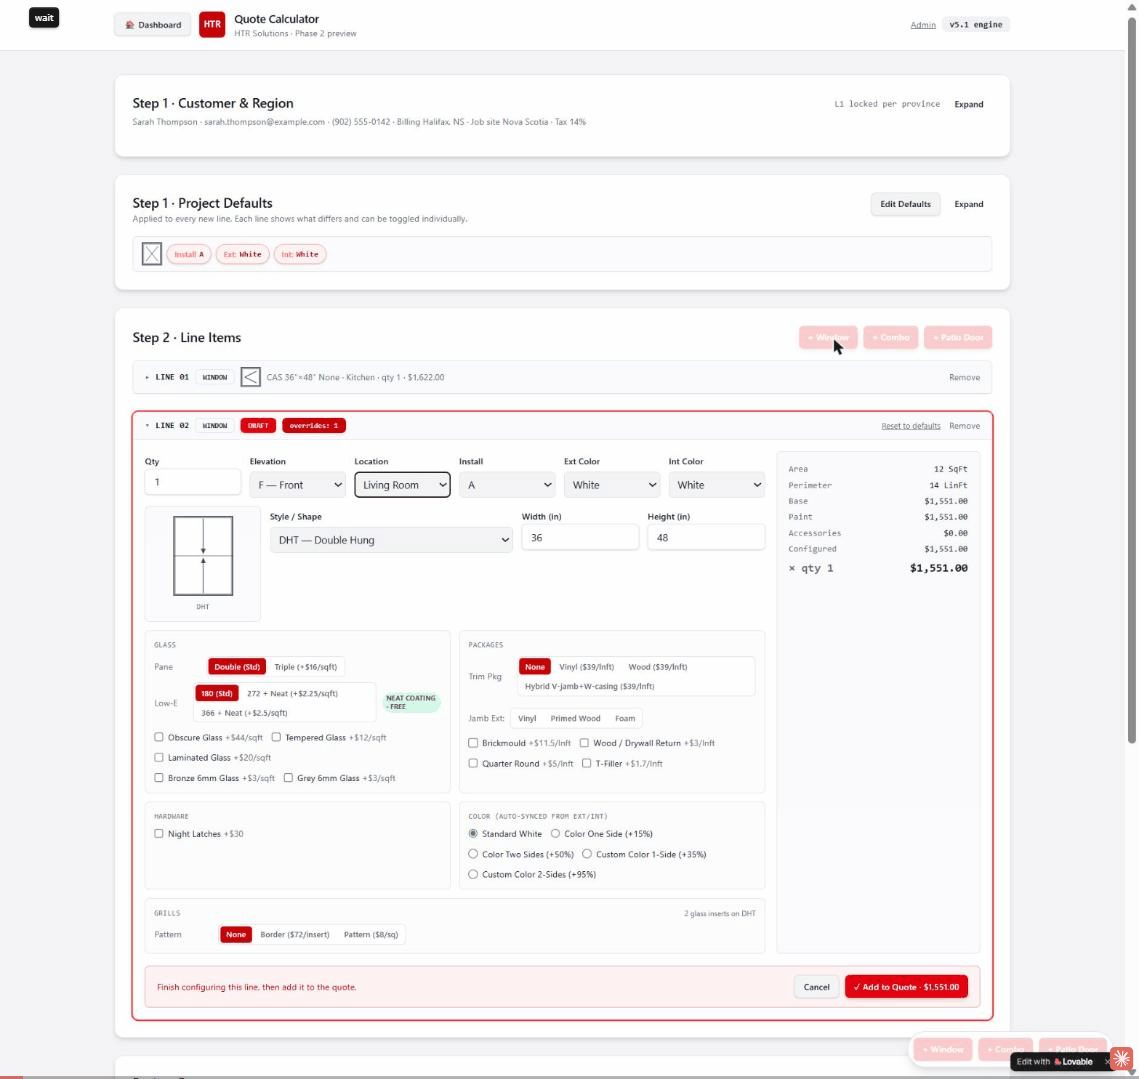
Add windows
"+ Window" → set Qty, Elevation, Location, Install, Style/Shape (e.g. CAS Casement, DHT Double Hung, PW Picture Window), Width & Height; for casements pick Left/Right hinge. Price updates live on the right. Click "✓ Add to Quote". Repeat per window.
Add combos
"+ Combo" → pick a layout from the visual picker (2-Wide, 3-Wide, stacks, grid), set Overall Width/Height, "Auto-split cells" or click a cell to fine-tune, then "Add to Quote".
Add a patio door
"+ Patio Door" → choose the SKU (size + slide direction, e.g. PD2 5ft LO), review included Standard Features, tick optional upgrades, "Add to Quote".
Project Extras
Click "Expand". For presets (Cut Outs, Bay/Bow, Capping, Blinds/Shutters) type a quantity. For one-offs click "+ Add custom", enter Name, Price and optional Description, then "Add". Extras add to gross before discount.
Discounts & balance
L1 is province-locked; L2 (Salesman) and L3 (Manager) only if authorized. Set Deposit % (default 40%). Read the Net subtotal and TOTAL in the Step 4 Balance panel.
Generate documents
Three buttons each download a PDF instantly (green toast confirms). See the comparison below for which one to use when.

Save the quote
Click "💾 Save Quote". It appears on the Dashboard under Quotes as a Draft with a quote number and total.
The three documents compared
📄 Quote sells the job · ✍️ Contract closes the job · 🔍 Detailed Report shows the math
| Feature | Quote PDF | Contract | Detailed Report |
|---|---|---|---|
| Title on page | Quote & Work Order | Supply & Install Contract | Detailed Quote Report |
| Mainly for | Customer + installer | Signing / legal | Internal / manager |
| Drawing of each unit | Yes | No (text spec table) | Yes |
| Per-line cost breakdown | Yes | No (unit price only) | Yes |
| Per-line "after discount" | Yes | No | Yes |
| Discount shown as | one 'cascading discount' line | one 'customer discount' line | L1/L2/L3 tiers broken out |
| What's Included / Not Selected lists | No | Yes | No |
| Full Terms & Conditions | No | Yes | No |
| Cancellation notice | No | Yes | No |
| Warranty detail | No | Yes (full) | No |
| Signature lines | Yes | Yes (+ acknowledgment) | No |
Which one do I send?
- • Win the job → Quote PDF
- • Customer says yes → Contract (only doc with terms, warranty, cancellation)
- • Manager review → Detailed Report